Showing posts with label diy. Show all posts

Friday, May 17, 2013

Getting Crafty with the Kiddies

So during Mother's day weekend my family always has to celebrate not only that holiday, but my little sister's birthday as well. This year I decided I would be the one who would plan everything and make it fun for my sister. She was doing great in school, and at home as well, so she deserved to be spoiled a little. She is a very creative kid, so we decided on a arts and crafts party (how fun!)
I went on pinterest and searched as many ideas as I could, and I ended up finding two really fun ideas. One was a mason jar luminary, which I though would be great for the kids to give to their moms, and decorate masks. The mason jar luminaries were super easy to make.
All you are going to need is:

  • mason jar
  • mod podge (or make your own by using 50/50 of elmers glue and water)
  • tissue paper (cut into different size pieces)
  • paint brush
  • battery operated tealight. (color changing ones are really cool to use, you can purchase it online on amazon or sometimes walmart)
All you do is:
  • using the brush, paint the mod podge/ glue mixture on the jar 
  • cover what you painted with the brush with tissue paper
  • paint over with glue once again
  • continue doing all these steps until the jar is covered.
  • let it dry overnight 
  • then watch your luminary lighten up the room :)
Overall the party was a success. We had lots of fun with the kids, even though it rained we made the best out of it :) Happy 11th Birthday Margarita!


Tuesday, April 23, 2013

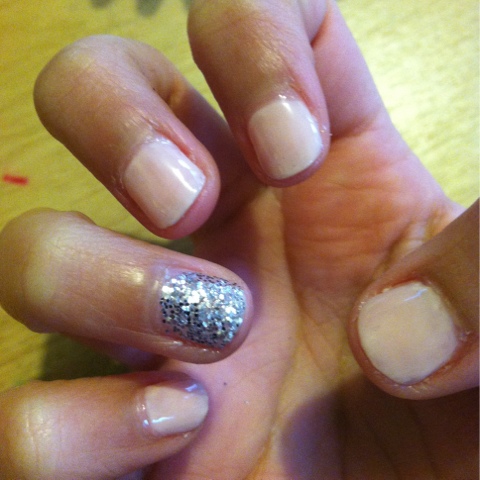
DIY No UV Gel Manicure

Hello my loves!
This week I want to share this wonderful idea I have found on pinterest. I love going to the nail salon and getting a gel manicure, but who am I kidding my budget will not allow me to spend $40 every two weeks. So I browsed on something I could do myself at home, and thank goodness for Pinterest I found the perfect thing. The Sweetest Thing is where I found this marvelous idea. She explained how the process is a bit long, but the polish will last longer than a regular manicure, AND there is NO UV light! So let's get started!

What you need:

  • Gelous Advanced Nail Gel Coat (I purchased mines at Sallys at about $5.49)
  • Any nail polish of your choice (I used one I already had I used Wet N Wild's Megalast in Sugar Coat)
  • Any top coat (I used Seche Vite Dry Fast Top Coat)
  • And a little glitter from the crafts store and something to dip your nail in (I used a coffee filter)


Here are the steps:
  1. Apply a thin coat of the Gelous polish and wait 2 minutes, and then apply another coat and wait another 2 minutes.
  2. Apply a thin coat of nail polish (and I mean a THIN coat, because you will add more) and let that dry for 4 minutes
  3. Now on the nail you want to add glitter don't let THAT nail dry completely, dip your finger in the glitter and shake off the excess. I would squeeze a little bit of the glitter on the nail so it's flat.
  4. Apply another layer of Gelous and let that dry for 2 minutes (except on the nail with the glitter, continue to let that dry.)
  5. Apply one more layer of nail polish and let that dry for 4 minutes
  6. Apply your top coat, and let it dry.


And that's it! It took me about an hour to do my gel manicure, and since I already had nail polish and a top coat, all I paid for was my Gelous polish! So it only cost me $5 for this manicure, after this it's always going to be free! Now how can you beat that?
I will say though, if you work a lot with your hands it might chip off a little the next day. I'm a cake decorator, so this always happens, but most of my nails stay completely polished for about a week.  
I hope this helped my loves, and I hope this helps some of you save some money :) 
Have a wonderful rest of the week! ♥


Tuesday, April 9, 2013

DIY Ombre

Hello Lovelies! So I had to create another blog because well, I forgot my email and password. Haha! Anywho, I always wanted to go for the ombre look, but never had the time or the money. (I mean in this economy who does?!) So I while I was at work looking around at the hair dyes and all that good stuff, I noticed the Loreal Paris Feria Wild Ombre box, before I even bought the box I wanted to see reviews and tutorials, and well I got convinced to buy it and try it myself! I purchased one box which was the 060 for medium to dark hair. Now let me tell you that my hair is a bunch of different colors already, so I was a little nervous to try it out. Also, one side of my hair for some reason has always been lighter than the other. Anyways I told my love that I was going to attempt doing the ombre look at his place, and so I began to prepare my work space. And this is what came in the box:
You get this cool comb that helps spread the color through your hair (I decided to wash it after I used it and keep it). So after opening everything and mixing them together (HEADS UP! The process for the pouring the powder in the bottle is difficult. TAKE YOUR TIME!) I used an old tshirt because in case this is your first time dying your hair, well it WILL get messy. I did my tips first and let that set for 3-5 minutes then finished coloring the rest of my hair. I went up at least 3-4 inches for all my layers. I parted my hair first just to make it easier. And so I waited 45 minutes. (ONLY wait up to 45 minutes, do not go for more than that, remember it's bleach, so it WILL damage your hair). Once that was done I washed my hair our with the shampoo conditioner they provided, but I also decided to use my Organix shampoo and conditioner just to help my ends come back to life. 
Overall I really like the color and quality of my hair. If you don't want to spend crazy amounts of money to get the ombre look, then I definitely recommend this product. I hope this was helpful for you guys! 

Here is my hair before attempting the ombre look (ignore the messy frizziness going on, I had work earlier haha!)

This was while I was waiting (about 20 minutes into the process)

 And this was the final result! 


Have a wonderful day loves!